How much time to spent during Code Reviews

Last week, I wrote my blog on Code Reviews. This week I am writing about how much time we should be spending during Code Reviews. I found an interesting article titled “Don’t Waste Time on Code Reviews” on DZone written by Jim Bird.

According to the article, research shows that reviewers find far more maintainability issues than defects (a ratio of 75:25) and spend more time on code clarity and understandability problems than correctness issues. There are a few reasons for this. Finding bugs in code is hard. Finding bugs in someone else’s code is even harder. In many cases, reviewers don’t know enough to find material bugs or offer meaningful insight on how to solve problems. Or they don’t have time to do a good job. So they cherry pick easy code clarity issues like poor naming or formatting inconsistencies. But even experienced and serious reviewers can get caught up in what at first seem to be minor issues about naming or formatting, because they need to understand the code before they can find bugs, and code that is unnecessarily hard to read gets in the way and distracts them from more important issues.

Code reviews add to the cost of development, and if you don’t do them right they can destroy productivity and alienate the team. But they are also an important way to find bugs and for developers to help each other to write better code. So do them right. Don’t waste time on meetings and moderators and paper work. Do reviews early and often. Keep the feedback loops as tight as possible. Ask everyone to take reviews seriously – developers and reviewers. No rubber stamping, or letting each other off of the hook. Make reviews simple, but not sloppy. Ask the reviewers to focus on what really matters: correctness issues, and things that make the code harder to understand and harder to maintain. Don’t waste time arguing about formatting or style. Make sure that you always review high risk code and high risk changes. Get the best people available to do the job – when it comes to reviewers, quality is much more important than quantity. Remember that code reviews are only one part of a quality program. Instead of asking more people to review code, you will get more value by putting time into design reviews or writing better testing tools or better tests. A code review is a terrible thing to waste.

I would say that the title was somewhat misleading though. I wish the title was less misleading, though – it’s easy to read as “Don’t do code reviews,” which isn’t what the post was saying. I think the title was either poorly worded or it was written that way intentionally as click bait. I think a better title would have been “Don’t Waste Time During Code Reviews”. I was spending lots of time reviewing code that a static code review tools can do. Form now, I would rather use tools like FindBugs and PMD which uses static analysis to look for bugs.

Source: https://dzone.com/articles/dont-waste-time-code-reviews
 

Setting up Angular Google Maps

This week I read few tutorials on Playing with Angular Google Maps. Turns out it’s really easy to get started with Angular Google Maps! For this blog post, I assume you’re familiar with setting up Angular 2 projects with Angular CLI & TypeScript.

Angular Google Maps (short name: AGM) gets shipped via the Node Package Manager (NPM). Run the following command to add it to your new project:

npm install @agm/coore –save

Setup @NgModule

Open src/app/app.module.ts and import the AgmCoreModule.
You neeed to provide a Google Maps API key to be able to see a Map. Get an API key form Google Maps Developer page.

import { BrowserModule } from '@angular/platform-browser';

import { NgModule, ApplicationRef } from '@angular/core';

import { CommonModule } from '@angular/common';

import { FormsModule } from '@angular/forms';

import { AppComponent } from './app.component';

import { AgmCoreModule } from '@agm/core';

@NgModule({

  imports: [

    BrowserModule,

    CommonModule,

    FormsModule,
    AgmCoreModule.forRoot({

      apiKey: 'YOUR_KEY'

    })

  ],

  providers: [],

  declarations: [ AppComponent ],

  bootstrap: [ AppComponent ]

})

export class AppModule {}

Extending the app component

Angular CLI already created an app component the we’ll now use to create our first google map.
Open the file src/app/app.component.ts and modify it like below:

import { Component } from '@angular/core';

@Component({

  selector: 'app-root',

  templateUrl: 'app.component.html',

  styleUrls: ['app.component.css'],

})

export class AppComponent {

  title: string = 'My first AGM project';

  lat: number = 51.678418;

  lng: number = 7.809007;

}


Setup the template

Open the file src/app/app.component.html and paste the following content:

<h1>{{ title }}</h1>

<!-- this creates a google map on the page with the given lat/lng from -->

<!-- the component as the initial center of the map: -->

<agm-map [latitude]="lat" [longitude]="lng">

  <agm-marker [latitude]="lat" [longitude]="lng"></agm-marker>

</agm-map>


Setup the CSS file

Open the file src/app/app.component.css and paste the following content:

agm-map {

  height: 300px;

}

Build and run your application

So we have created all the needed source files, so everything should be ready to build an run the application.

Run the following command in the project root folder:

ng serve

Source: https://angular-maps.com/guides/getting-started/

Angular  2 HTTP Module

This week I read an article on new Angular HTTP Module. In this post, we are going to look into: New Angular Data Architecture using RxJS 5 and Setting up angular/http.

Angular introduces many innovations: performance improvements, the Component Router, sharpened Dependency Injection (DI), lazy loading, async templating, Server rendering (aka Angular Universal), orchestrated animations, mobile development with Native Script; all topped with a solid tooling (thanks to TypeScript and the new Angular CLI) and excellent testing support.

Angular uses Reactive Programming as its core building block. This is based on Asynchronous Data Streams aka Observables. Reactive Extensions for JavaScript (RxJS) is a reactive streams library that allows you to work with Observables. RxJS combines Observables, Operators and Schedulers so we can subscribe to streams and react to changes using composable operations.

Setting up angular/http

In order to use the new Http module in our components we have to import Http (. After that, we can just inject it via Dependency Injection in the constructor.

Besides the changes to our components using Http, we also need to include HttpModule during bootstrap. We made HttpModule available during bootstrap, using an Array for the property imports within ngModule. Note we imported it from: angular/http. For Angular, Http is no longer included in the core but as a separate file.

Dependency Injection

In order to make our service available for DI we added the @Injectable annotation. This indicates the Dependency Injector that the class has dependencies that should be injected into the constructor when creating an instance of the class.

Annotations allow us to declaratively add metadata to classes and properties for Angular to use. Common annotations are: @Component, @Injectable, @Pipe or @NgModule.

We defined a simple service using a class. We also preceded it with export to make it accessible to other components. Find below the syntax you use to inject Http into the constructor’s http argument.

Source: https://medium.com/google-developer-experts/angular-2-introduction-to-new-http-module-1278499db2a0


Web App Testing

Since we (Me and Dan) are working as a team to build a web app for our final project in 343 class, I thought to learn how to test web apps would be essential. So, this week I read an article on Software Testing Help site, which was a guide about testing web applications.

As per the author, these are the most common web testing checklists:

1) Functionality Testing

Test for all the links in web pages, database connection, forms used for submitting or getting information from user in the web pages, Cookie testing etc.

Cookies Testing: Test the application by enabling or disabling the cookies in your browser options. Test if the cookies are encrypted before writing to user machine. If you are testing the session cookies check for login sessions and user stats after session ends.

Validate your HTML/CSS: If you are optimizing your site for Search engines then HTML/CSS validation is the most important one. Mainly validate the site for HTML syntax errors. Check if the site is crawlable to different search engines.

Database testing: Check for data integrity and errors while you edit, delete, modify the forms or do any DB related functionality.

2) Usability testing

Test for navigation: Navigation means how an user surfs the web pages, different controls like buttons, boxes or how the user uses the links on the pages to surf different pages.

Content checking: Check for spelling errors. Usage of dark colours annoys the users and should not be used in the site theme. You can follow some standard colours that are used for web page and content building.

3) Interface testing

Check if all the interactions between these servers are executed and errors are handled properly. If database or web server returns any error message for any query by application server then application server should catch and display these error messages appropriately to the users. Check what happens if user interrupts any transaction in-between? Check what happens if connection to the web server is reset in between?

4) Compatibility testing

Compatibility of your website is a very important testing aspect. See which compatibility test to be executed such as Browser compatibility, Operating system compatibility, Mobile browsing, Printing options.

5) Performance testing

Web Load Testing:  You need to test if many users are accessing or requesting the same page. Can system sustain in peak load times? Site should handle many simultaneous user requests, large input data from users, simultaneous connection to DB, heavy load on specific pages etc.

Web Stress Testing: Web stress testing is performed to break the site by giving stress and its checked as how the system reacts to stress and how it recovers from crashes. Stress is generally given on input fields, login and sign up areas.

6) Security testing

Following are some of the test cases for web security testing:

  • Test by pasting internal URL directly onto the browser address bar without login. Internal pages should not open.
  • If you are logged in using username and password and browsing internal pages then try changing URL options directly. I.e. If you are checking some publisher site statistics with publisher site ID= 123. Try directly changing the URL site ID parameter to different site ID which is not related to the logged in user. Access should be denied for this user to view others stats.
  • Try some invalid inputs in input fields like login username, password, input text boxes etc. Check the systems reaction on all invalid inputs.
  • Web directories or files should not be accessible directly unless they are given download option.
  • Test the CAPTCHA for automates script logins.
  • Test if SSL is used for security measures. If used proper message should get displayed when user switch from non-secure http:// pages to secure https:// pages and vice versa.
  • All transactions, error messages, security breach attempts should get logged in log files somewhere on the web server.

Although it was a quite a lengthy article, I enjoyed reading it. We may not get time to test every aspect of our web app, but I will definitely keep on eye on the security aspects. In our web app we have a login in screen for the members of a team. I will test the method as suggested in the article to browse internal pages then try changing URL options directly. I think it would be a fun to include CAPTCHA security measures to prevent automates script logins.

Source: http://www.softwaretestinghelp.com/web-application-testing/


Angular 2 Routing With Modules

Last week I learnt about different purposes of Angular 2 modules. This week I looked how to implement Angular 2 router modules. Adding router logic / router configuration to our app by using modules is very easy. Router modules can be used on application module and feature module level.

1) Start with a new project setup

2) Add Some Additional Components in App Folder

3) Next Add the Router Module

A new file needs to be created in app folder to implement the router module: app.routing.ts.

First we need to add a few import statements on top of the file:

NgModule is imported from @angular/core. The module decorator is needed to declare routing modules.

Routes and RouterModule are imported from @angular/router. The Routes class type is used to create route configuration. RouterModule is the Angular 2 standard Router module and needs to be imported by every routing module.

Import statements for our components FirstComponent, SecondComponent and ThirdComponent are added as well.

Next we’re creating a const array of type Routes. This array contains four route configuration element. Each element consists of the following properties:

  1. path: The URL path of the route as a string
  2. component: The component which should be loaded when the path is used.

There is the first route configuration element which does not comply with that pattern. Instead you’ll find the following properties: path, pathMatch and redirectTo.

That’s a route redirect. We’re defining that the root path of the application should be redirected to path ‘first’. This means that when the users enters http://localhost/ a redirect to http://localhost/first is done automatically.

Now that the routes array is containing the routing configuration we can pass that configuration array to the RouterModule.forRoot(routes) method. This method returns a Router module which is containing our configuration. The forRoot method call is placed inside the imports array. This is needed because we would like to import the resulting module in AppRoutingModule.
4) Import AppRoutingModule in AppModule

Here we’re importing AppRoutingModule and routingComponents from app.routing.ts. The AppRoutingModule is added to the array which which is assigned the imports property of @NgModule. The routingComponents array is used to add all routing modules to the declarations array.

5) Implement Template of AppComponent

To complete the implementation we need to add a template for component AppComponent. In addition the template code contains the <router-outlet> element. This element is a placeholder to tell Angular where the HTML output of the router component should be inserted.

We’re ready to go now.

Source: https://medium.com/codingthesmartway-com-blog/angular-2-routing-with-modules-dd9e25bdd651

Test Automation

This week I read an article on Automated Testing. The article explained why Test Automation software is the best way to increase the effectiveness, efficiency and coverage of our software testing. According to the article, once automated tests are created they can easily be repeated and they can be extended to perform tasks impossible with manual testing. Because of this, savvy managers have found that automated software testing is an essential component of successful development projects. Some of the major merits of using Automated Testing over the Manual software testing are:

Automated Software Testing Saves Time and Money: Once created, automated tests can be run over and over again at no additional cost and they are much faster than manual tests. Automated software testing can reduce the time to run repetitive tests from days to hours. A time savings that translates directly into cost savings.

Vastly Increases Your Test Coverage: Automated software testing can increase the depth and scope of tests to help improve software quality. Lengthy tests that are often avoided during manual testing can be run unattended. They can even be run on multiple computers with different configurations. Automated software testing can look inside an application and see memory contents, data tables, file contents, and internal program states to determine if the product is behaving as expected. Test automation can easily execute thousands of different complex test cases during every test run providing coverage that is impossible with manual tests.

Testing Improves Accuracy: Even the most conscientious tester will make mistakes during monotonous manual testing. Automated tests perform the same steps precisely every time they are executed and never forget to record detailed results. Testers freed from repetitive manual tests have more time to create new automated software tests and deal with complex features

Automation Does What Manual Testing Cannot: Even the largest software and QA departments cannot perform a controlled web application test with thousands of users. Automated testing can simulate tens, hundreds or thousands of virtual users interacting with a network, software and web applications.

Automated QA Testing Helps Developers and Testers: Shared automated tests can be used by developers to catch problems quickly before sending to QA. Tests can run automatically whenever source code changes are checked in and notify the team or the developer if they fail. Features like these save developers time and increase their confidence.

I do believe the above benefits would definitely help to improve the testing processes with the help of the automated testing tools. As a tester, automation makes our lives easier, by using it to overcome problems such as time and testing more efficiently to ensure quality is maintained not just within the application being developed but also within the testing process. I look forward to get my hands on some of the automated testing tools during my upcoming projects.

Source: https://smartbear.com/learn/automated-testing/

Angular 2 Modules

This week I decided to look into Routing With Modules. By using the new @NgModule decorator we’re able to define modules in our Angular 2 application. The decorator is attached to a class an contains a set of meta data which describes the module. According to the official Angular 2 documentation Angular 2 modules are used to “help organize an application into cohesive blocks of functionality”.

Advantages of modularity in Angular 2

  • Application can be organized in smaller blocks of functionality
  • Easy to extend application by including modules (e.g. for external libraries)
  • Angular 2 offers standard libraries like: FormsModule, HttpModule, RouterModule
  • Angular Modules consolidate components, directives and pipes into blocks of functionality

In fact, Angular 2 modules can be used for different purposes:

One application module is defined for each application. This module is named AppModule and implemented in file app.module.ts by convention. The application / root module is the main entry point and contains components, pipes and services which do not belong the subsequent feature modules and should be available application-wide.

In addition to the application module, feature modules can help to further structure your application and group your implementation in blocks of functionality. Furthermore feature modules can speed up your application and enable lazy-loading. When your app starts you may not want that everything is loaded at once. Feature areas which are not needed first can be loaded later. Keeping everything together in a feature module is the prerequesite for enabling lazy-loading in your app.

Modules are also used to encapsulate router configuration. Configuring routes can be done on the level application level (for AppModule) or on the level of subsequent feature modules. By specify routes we’re defining which component should be loaded and displayed when the user points to a certain URL in the browser.

Source: https://medium.com/codingthesmartway-com-blog/angular-2-routing-with-modules-dd9e25bdd651

Code Review Guidelines

Since we are doing an assignment on “Software Technical Review”, every reviewer is required to follow certain guidelines while reviewing the code. So, this week I read an article on code review guidelines written by Madalin Ilie.

Ilie starts the article by explaining why Code Reviews are important? As per the article, software testing alone has limited effectiveness — the average defect detection rate is only 25 percent for unit testing, 35 percent for function testing, and 45 percent for integration testing. In contrast, the average effectiveness of design and code inspections are 55 and 60 percent. Case studies of review results have been impressive.

Then the author, lists some useful tips for the reviewer, as:

Critique code instead of people – be kind to the coder, not to the code. 

Treat people who know less than you with respect, deference, and patience. Nontechnical people who deal with developers on a regular basis almost universally hold the opinion that we are prima donnas at best and crybabies at worst. Don’t reinforce this stereotype with anger and impatience.

The only true authority stems from knowledge, not from position. Knowledge engenders authority, and authority engenders respect – so if you want respect in an egoless environment, cultivate knowledge.

Note that Review meetings are NOT problem solving meetings.

Ask questions rather than make statements.

Avoid the “Why” questions. Although extremely difficult at times, avoiding the “Why” questions can substantially improve the mood. Just as a statement is accusatory—so is a why question. Most “Why” questions can be reworded to a question that doesn’t include the word “Why” and the results can be dramatic.

Remember to praise. The purposes of code reviews are not focused at telling developers how they can improve, and not necessarily that they did a good job. Human nature is such that we want and need to be acknowledged for our successes, not just shown our faults. Because development is necessarily a creative work that developers pour their soul into, it often can be close to their hearts. This makes the need for praise even more critical.

Make sure you have good coding standards to reference. Code reviews find their foundation in the coding standards of the organization. Coding standards are supposed to be the shared agreement that the developers have with one another to produce quality, maintainable code. If you’re discussing an item that isn’t in your coding standards, you have some work to do to get the item in the coding standards. You should regularly ask yourself whether the item being discussed is in your coding standards.

Remember that there is often more than one way to approach a solution. Although the developer might have coded something differently from how you would have, it isn’t necessarily wrong. The goal is quality, maintainable code. If it meets those goals and follows the coding standards, that’s all you can ask for.

I much agree with everything in this list. While every item on the list is important, some have more resonance for me. As much as possible, I will try to make all of my comments positive and oriented to improving the code. Overall, I believe this article will definitely aid me to be more effective during my code review time.

Source: https://www.codeproject.com/Articles/524235/Codeplusreviewplusguidelines

Facade Pattern

Continuing with series of articles written by James Sugrue, taking each design pattern one by one, this week I read about the Facade Pattern.  Since Facade has some similarities with the Adapter, so it’s a logical next step in for me to know about the differences between the two design patterns.

I am really starting to like Sugrue’s “In the Real World ” part more as it helps me to visualize the design pattern. The example he provided for the facade Pattern is about Operating Systems. We don’t see all the inner workings of our computer, but the OS provides a simplified interface to use the machine. Another example he provides is about the buildings architecture as: buildings also have a facade – the exterior of the building. In architecture, the facade of a building is often the most important from a design standpoint, as it sets the tone for the rest of the building.  In a nutshell, a Facade aims to make things look cleaner and more appealing.

Like the Adapter pattern, Facade is known as a structural pattern, as it’s used to identifying a simple way to realize relationships between entities. The definition of Facade states: Provide a unified interface to a set of interfaces in a subsystem. Facade defines a higher-level interface that makes the subsystem easier to use.

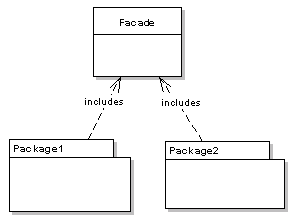
The UML diagram definition of the Facade pattern is given below:

facade_class

In the diagram all we’re really doing is insulating client from the subsystem. Like the adapter pattern, the Facade can be used to hide the inner workings of a third party library, or some legacy code.  All that the client needs to do is interact with the Facade, and not the subsystem that it is encompassing.

As the concept behind facade is to simplify an interface, service oriented architectures make use of the facade pattern. For example, in web services, one web service might provide access to a number of smaller services that have been hidden from the caller by the facade. Similarly, a typical pattern in OSGi bundles is to provide an interface package that is exposed to users of the bundle. All other packages are hidden from the user.

As per the author Sugrue, by introducing the Facade into our code, we will be hardwiring subsystems into the Facade. This is fine if the subsystem never changes, but if it does, our Facade could be broken. Therefore, developers working on the subsystem should be made aware of any Facade around their code.

After reading the article, I came to conclude the main key difference between Facade and Adapter design pattern is that: Facade defines a new interface, whereas Adapter uses an old interface. Adapter makes two existing interfaces work together as opposed to defining an entirely new one. I found the Facade can be implemented to produce a simpler interface, whereas the Adapter to design to an existing interface.

I will definitely be using one of these design patterns, when I need to link two or more interfaces.

Source: https://dzone.com/articles/design-patterns-uncovered-1

Code Coverage

While writing test cases, the one main question that usually strikes my mind was how much of the source code will be tested? To get better understating of it, this week I read an article on Code coverage. Basically, the article is about how to get started with code coverage, find the right tool, and how to calculate it.

Sten Pittet, the author of the article, mentions that the way to calculate the is to use code coverage tools. These tools will use one or more criteria to determine how your code was exercised or not during the execution of your test suite. The common metrics that you might see mentioned in your coverage reports include:

Function coverage: how many of the functions defined have been called.

Statement coverage: how many of the statements in the program have been executed.

Branches coverage: how many of the branches of the control structures (if statements for instance) have been executed.

Condition coverage: how many of the boolean sub-expressions have been tested for a true and a false value.

Line coverage: how many of lines of source code have been tested.

These metrics are usually represented as the number of items actually tested, the items found in your code, and a coverage percentage.

Pittet also lists some of the most popular tools to create coverage reports depending on the language. They include:

Java: Atlassian Clover, Cobertura, JaCoCo

Javascript: istanbul, Blanket.js

PHP: PHPUnit

Python: Coverage.py

Ruby: SimpleCov

Talking about the percentage of coverage should you aim for, Pittet states, there’s no silver bullet in code coverage, and a high percentage of coverage could still be problematic if critical parts of the application are not being tested, or if the existing tests are not robust enough to properly capture failures upfront. It is generally accepted that 80% coverage is a good goal to aim for. Trying to reach a higher coverage might turn out to be costly, while not necessary producing enough benefit. He suggests to focus on unit testing first as they’re generally cheap to implement and fast to run and give you an overall assurance that the basis of the platform is solid. A simple way to increase quickly your code coverage is to start by adding unit tests as, by definition, they should help you make sure that your test suite is reaching all lines of code.

I feel the first time when I will to run the coverage tool I might ended up having a fairly low percentage of coverage. As per the suggestion of the writer, since I am just getting started with testing it’s a normal situation to be in and I shouldn’t feel the pressure to reach 80% coverage right away. I believe rushing into a coverage goal might push me to write tests that are hitting every line of the code instead of writing tests that are based on the overall requirements of the project.

Source: https://www.atlassian.com/continuous-delivery/introduction-to-code-coverage