Adapter Pattern

This week I read an article about the Adapter pattern, written by James Sugrue in the DZone website.

I liked the real world analogy Sugrue gave for the easy understanding of the Pattern. The example he provided for the adapter pattern is based around AC power adapters. Say we’re visiting Europe from the US, with our laptop, which expects a US power supply. To get our laptop plugged in, we’re going to need to get a power adapter that accepts our US plug and allows it to plug in to the European power outlet. The AC adapter knows how to deal with both sides, acting as a middleman – this is the adapter pattern.

The Adapter is known as a structural pattern, as it’s used to identifying a simple way to realize relationships between entities. The definition of Adapter states: Convert the interface of a class into another interface clients expect. Adapter lets classes work together that couldn’t otherwise because of incompatible interfaces.

The classic diagram definition of the adapter pattern is given below:

adapter_pattern_0

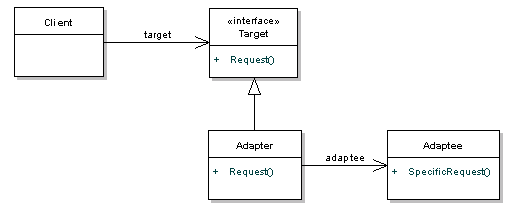
The Target interface defines the domain specific interface that the Client used, so the client collaborates with objects that implement the Target interface. On the other side of things, the Adaptee is the existing interface that needs adapting in order for our client to interact with it. The Adapter adapts the Adaptee to the Target interface – in other words, it translates the request from the client to the adaptee.

The main use of this pattern is when a new system wants to interact with legacy system using new interface which is not compatible with interface of legacy system. Moreover, when a class that we need to use doesn’t meet the requirements of an interface. For a particular object to contribute to the Properties view, adapters are used display the objects data. The view itself doesn’t need to know anything about the object the it is displaying properties for.

Some say that the Adapter pattern is just a fix for a badly designed system, which didn’t consider all possibilities. While this is a fair point, it is an important part of a pluggable architecture.  It can also add a level of complexity to our code, making debugging more difficult.

After reading the article, I think in the integration aspects Adapter pattern is a time saver.  I think that the adapter gives a great solution for legacy systems, and it doesn’t imply bad design. Even with a very good design, class which was once created would become a legacy class as more and more clients start using it. So, at one point of time, we might have to use adapters. With that being said, I think it’s true that adapter adds a level of complexity to our code. If there are no proper naming conventions and comments, the code is difficult to follow through. I believe we can minimize the complexity by modularizing the legacy class and adapter in separate files.

Source: https://dzone.com/articles/design-patterns-uncovered-0


Why use Mocking

After being familiar with JUnit testing, I wanted to look more into Mocking. The idea of mock objects was confusing at first. In class our Prof. covered some examples how to use various mock object frameworks such as EasyMock and Jmockit. So, I thought to do some more readings on it. The article I read focusses on the concept of mocking in general. What is a mock object? What is it used for? Why can’t I mock object XYZ?

In the real world, software has dependencies. We have action classes that depend on services and services that depend on data access objects.  The idea of unit testing is that we want to test our code without testing the dependencies. The code below would be an example of this:

import java.util.ArrayList;

public class Counter {
 public Counter() {
 }

public int count(ArrayList items) {
 int results = 0;

for(Object curItem : items) {
 results ++;
 }

return results;
 }
 }

If we wanted to test the method count, we would write at test that addressed how the count method works. We aren’t trying to test that ArrayList works because you assume that it has been tested and works as designed. Our only goal is to test your use of ArrayList.

Let’s look at a slightly more realistic example:

public class Action extends ActionSupport {

private LookupService service;

private String key;

public void setKey(String curKey) {
 key = curKey;
 }

public String getKey() {
 return key;
 }

public void setService(LookupService curService) {
 service = curService;
 }

public String doLookup() {

if(StringUtils.isBlank(key)) {
 return FAILURE;
 }
List results = service.lookupByKey(key);

if(results.size() > 0) {
 return SUCCESS;
 }

return FAILURE;
 }
 }

We wanted to test the doLookup method in the above code, we would want to be able to test it without testing the lookupByKey method. For the sake of this test, we assume that the lookupByKey method is tested to work as designed. As long as we pass in the correct key, we will get back the correct results. In reality, we make sure that lookupByKey is also tested if it is code we wrote. How do we test doLookup without executing lookupByKey? The concept behind mock objects is that we want to create an object that will take the place of the real object. This mock object will expect a certain method to be called with certain parameters and when that happens, it will return an expected result. Using the above code as an example, let’s say that when we pass in 1234 for my key to the service.lookupByKey call, we should get back a List with 4 values in it. Our mock object should expect lookupByKey to be called with the parameter “1234” and when that occurs, it will return a List with four objects in it.

After reading the article, the key takeaways for me was to know that mock objects are a very valuable tool in testing. They provide us with the ability to test what we write without having to address dependency concerns. In my coming weeks I will learn about implementing a specific mocking framework.

Source: http://www.michaelminella.com/testing/the-concept-of-mocking.html

Observer Pattern

This week I read an article on Observer design pattern. Since for my ‘Assignment 2 – Additional Design Patterns’ I was doing lots of research on Observer pattern (which I will be writing a tutorial on), I found this particular post to the most informative one.

Basically, the Observer pattern falls under behavioural pattern, as it’s used to form relationships between objects at runtime. The Observer pattern is the gold standard in decoupling – the separation of objects that depend on each other. The definition provided in the original Gang of Four book on Design Patterns states:

Define a one-to-many dependency between objects so that when one object changes state, all its dependents are notified and updated automatically.

The idea behind the pattern is – one of more Observers are interested in the state of a Subject and register their interest with the Subject by attaching themselves. When something changes in Subject that the Observer may be interested in, a notify message is sent, which calls the update method in each Observer. When the Observer is no longer interested in the Subject’s state, they can simply detach themselves.

observer_pattern

Fig. The UML diagram definition

James Sugrue, the author of the article, points the main benefit of using this pattern. He mentions that- to pass data onto the observers, subject doesn’t need to know who needs to know. Instead, everything is done through a common interface, and the notify method just calls all the objects out there that have registered their interest. This is a very powerful decoupling – meaning that any object can simply implement the Observer interface and get updates from the Subject.

Sugrue suggests using this pattern to reduce coupling. He argues – if you have an object that needs to share its state with others, without knowing who those objects are, the Observer is exactly what you need.

After reading about the SOLID principles for my first blog, I believe the observer pattern allows for the Open Closed principle, which stated that a class should be open for extensions without the need to change the class. Open Closed principle holds true while using the observer pattern as a subject can register an unlimited number of observers and if a new observer wants to register with the subject, no code change in the subject is necessary. Now, I feel I have a good understanding of the Observer pattern which helps me in writing a tutorial on it.

Source: https://dzone.com/articles/design-patterns-uncovered


AssertThat over Assert Methods

This week I read an article about the Benefits of using assertThat over other Assert Methods in Unit Tests. Since in our reading materials prof. Wurst is using assertThat instead of traditional Asserts, now is the time to familiarize myself with the new asserting statements.

According to the article, AssertThat method incorporates the use of the hamcrest library and is a much improved way to write assertions. It uses what’s called matchers which are self-contained classes which have static methods that get used with the assertThat method. These static methods can be chained which gives a lot of flexibility over using the old assert methods.

Until now I have been using assertequals while writing my test cases. The biggest issue I had was to remember the correct ordering of (expected, actual) in assertEquals(expected, actual) statement. The keywords ‘expected’ and ‘actual’ used were not even informative enough to determine what exactly goes in it. With the use of assertThat method I don’t see such complications. The first benefit I see is that assertThat is more readable than the other assert methods. Writing same assertion with assertThat looks like:

assertThat(actual, is(equalTo(expected)))

It reads more like a sentence. Assert that the actual value is equal to the expected value, which make more sense.

Similarly, to check for not equals, used to be:

assertFalse(expected.equals(actual))

Now with the use of assertThat it will be:

assertThat(actual, is(not(equalTo(expected)))

The “not” method can surround any other method, which makes it a negate for any matcher. Also, the matcher methods can be chained to create any number of possible assertions. There’s an equivalent short-hand version of the above equality methods which saves on typing:

assertThat(actual, is(expected))

assertThat(actual, is(not(expected)))

Another benefit to assertThat is generic and type-safe. The below given example of assertEquals compiles, but fails:

assertEquals(“abc”, 123)

The assertThat method does not allow this as it typed, so the following would not compile:

assertThat(123, is(“abc”))

This is very handy as it does not allow comparing of different types. I find this a welcome change.

Another benefit to using assertThat are much better error messages.  Below is a common example of the use of assertTrue and its failure message.

assertTrue(expected.contains(actual))

java.lang.AssertionError at …

The problem here is that the assertion error doesn’t report the values for expected and actual.  Granted the expected value is easy to find, but a debugging session will probably be needed to figure out the actual value.

The same test using assertThat:

assertThat(actual, containsString(expected))

java.lang.AssertionError: Expected: a string containing “abc”

In this case, both values are returned in the error message. I think this a much better since in many cases I can just look at the error message and figure out right away what I did wrong rather than having to debug to find the answer. That saves my time and hassle. I am excited to get my hands on with the new AssertThat method in my upcoming days.

Source: (https://objectpartners.com/2013/09/18/the-benefits-of-using-assertthat-over-other-assert-methods-in-unit-tests/)


SOLID Principles

This week I read a blog on SOLID principles. I believe using SOLID principles in the software design process will guide me in the creation of clean and robust code.

According to the blog, there are many design principles out there, but at the basic level, there are five principles which are abbreviated as the SOLID principles.

Single Responsibility Principle: One class should have one and only one responsibility.

We should write, change and maintain a class for only one purpose. If it is model class, then it should strictly represent only one actor/ entity.

Opened Closed Principle: Software components should be open for extension, but closed for modification.

Classes should be designed such a way that whenever fellow developers wants to change the flow of control in specific conditions in application, all they need to extend your class and override some functions.

Liscov Substitution Principle: Derived types must be completely substitutable for their base types.

The classes fellow developer created by extending your class should be able to fit in application without failure. I.e. if a fellow developer poorly extended some part of your class and injected into framework/ application then it should not break the application or should not throw fatal exceptions.

Interface Segregation Principle: Clients should not be forced to implement unnecessary methods which they will not use.

It is applicable to interfaces as single responsibility principle holds to classes.

Dependency Inversion Principle: Depend on abstractions, not on concretions.

Design your software in such a way that various modules can be separated from each other using an abstract layer to bind them together.

Among the five principles, the ones that were new and interesting to me, were: Liscov’s Substitution Principle and Dependency Inversion Principle. I found Liscov’s Substitution Principle to be some what similar to inheritance, like a proper way of ensuring that inheritance is used correctly. If inheritance is not implemented correctly, class hierarchies would be a mess. Similar thing holds true for the Liscov’s Principle, if a subclass instance was passed as parameter to methods, strange behavior might occur. Similarly, after reading about Dependency Inversion Principle, I learnt that high level modules should not depend upon low level modules. I believe this helps to save much time and efforts, when we need to change the higher level code if a change occurs in the lower level classes. This ultimately, produces more-reusable code. I will definitely keep eye on these SOLD design principles while coding.

Source: (https://howtodoinjava.com/best-practices/5-class-design-principles-solid-in-java/)

Unit Testing: JUnit

Since for the second part of our “Software Quality Assur & Test” class, we are now beginning to test object-oriented software, I thought it would be useful for me to expand my knowledge of horizon on Junit. The article I read this week is about unit testing with JUnit. It explains the creation of JUnit tests. It also covers the usage of the Eclipse IDE for developing software tests.This blog will be centered around JUnit topics that I found useful for both my current software testing course and my professional career as well.

Define a test: To define that a certain method is a test method, annotate it with the @Test annotation. This method executes the code under test. Use an assert method, provided by JUnit to check an expected result versus the actual result.

Naming conventions: As a general rule, a test name should explain what the test does. If that is done correctly, reading the actual implementation can be avoided.

Test execution order: JUnit assumes that all test methods can be executed in an arbitrary order. Well-written test code should not assume any order, i.e., tests should not depend on other tests.

Defining test methods: JUnit uses annotations to mark methods as test methods and to configure them such as:

@Test, @Before, @After, @BeforeClass, @AfterClass, @Ignore , @Test (expected = Exception.class), @Test(timeout=100).

Assert statements: JUnit provides static methods to test for certain conditions via the Assertclass. These assert statements typically start with assert. They allow us to specify the error message, the expected and the actual result. An assertion method compares the actual value returned by a test to the expected value. It throws an AssertionException if the comparison fails. Most common methods include:

fail([message]), assertTrue([message,] boolean condition), assertFalse([message,] boolean condition), assertEquals([message,] expected, actual), assertNotEquals([message], expected, actual), assertNull([message], object-reference).

Form now onwards, I will be naming my test methods as logically as I can, so that not only I know what exactly the test does, but also be easier for my team member to not to dig into the actual code, thereby saving the time, while working on group. Moreover, I will also avoid using testcase naming convention which uses class names and method names for testcases name.

Most of the times while writing my test cases, I used to think about the bigger picture. I used to scan through the entire project’s code, making sure that I know the relations and dependencies among the classes. This way, often, I ended up writing test cases that must be executed in a particular order. But now I will remember that tests should be independent, and test only one code unit at a time. I will try to make each test independent to all the others.

Furthermore, while writing my asserts I will provide meaningful message in assert statements that will makes it easier later on to identify what exactly happened and fix the problem, if any error occurred.

For my next week I am looking forward in learning more about exceptions testing and uses of assertThat statement.

Source: http://www.vogella.com/tutorials/JUnit/article.html


The Software Craftsman: Chapters 15 & 16

In chapter 15, “Pragmatic Craftsmanship”, author Mancuso defines what pragmatic craftsmanship is. He states craftsmanship without pragmatism is not craftsmanship. A craftsman’s primary focus is customer satisfaction. Besides quality, time and cost are part of this satisfaction. Job as craftsmen is to lower the cost of quality to a point that it is not a concern anymore. For that, we need to master our practices and be pragmatic. We need to understand the value that certain practices bring in different contexts. When dealing with craftsmen, clients should never pay more for quality.

Furthermore, this chapter, busts the myth that quality is costly. Cheap and average code is good enough, maybe in the short term, but never in the medium and long term. Regardless of what managers and product owners say, they all expect quality. They would always choose quality if they didn’t need to trade it off for something else, like time and money.

What I learnt from this chapter is the true meaning of code. I used to think that code is a piece of software which perform certain task. Of course it needs to accomplish the task successfully, but also more importantly it should be well-crafted in every possible way. It should also provide a long term value.

Chapter 16, “A Career as a Software Craftsman” discuss what it is to be a craftsman and how to have a successful and fulfilling career. Honesty and courage are essential qualities of a software craftsman. Software craftsmen are passionate about software development and their profession. Being a craftsman is more than being a good developer who writes code well and delivers business value. It’s a lifestyle. Moreover, being a craftsman means to be curious and experiment with new things. It means to be pragmatic, always looking for simple solutions and using the best tools for the job.

Yes, being a software developer is beyond awesome. Being known as a Software Craftsman (hopefully in future) is the best decision I made in my life. It’s a life where I choose to do things well, to be the best I can be. But the tile comes with responsibilities. I should be honest, courage, and full transparent, which I will be.


The Software Craftsman: Chapters 13 & 14

In chapter 13, “Culture of Learning”, author Mancuso talks about different things developers can do to create a culture of learning. According to author, we will never change an organization by forcing people to adopt a new process or different practices. Instead, we should create a culture of learning, where people can find their own motivation to make things better. Creating a culture of learning is one of the most efficient ways of injecting passion into a company. We should let developers decide how, when, and what they want to learn. With this freedom, developers have much better chance of creating and embracing a culture of learning.

Author lists some of the things developers can do to create a learning environment. He suggests in: Starting a book club; Having a tech launch; Having a group discussions; Switching project for an iteration; Switching projects for a few hours; Conducting group code reviews; Having hands-on coding sessions.

From this chapter, I learnt how to focus upon establishing a rhythm. Software developing isn’t an easy task. We go through a lots of stress, which makes it difficult to get back to work, catch the ongoing rhythm, and keep engage ourselves into the culture of learning. I will from now follow the author suggestion that is, to having a healthy community, and keeping the sessions going. I will stop finding excuses and be willing to start new things.

Chapter 14 titled “Driving Technical Changes” revolves around several types of skeptics and how to convince them to be more open to different ideas. Author argues to be successful, we need to understand how to deal with all the different types of people we will need to interact with and convince along the way. Being good at what we do, being able to communicate clearly and most critical, having the capacity to build up trust are the essential skills for any for any developer. Setting ourselves up is equally important to be successful. We need to have understanding of whom we are speaking to, and appreciate the reasons for each person’s thinking.

This chapter helped to boost my confidence level. I learnt how to be be brave and say everything I think, no matter what. I shouldn’t be afraid to engage in debates with my co-workers. Whatever I do, I should be that the product I deliver adds value to your customers. This way, I don’t need to keep convincing my manager.